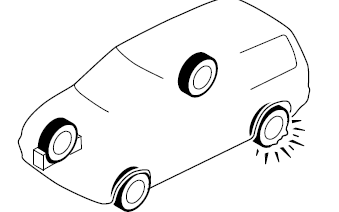
Mazda CX-9 Owners Manual: Changing a Flat Tire
NOTE If the following occurs while driving, it could indicate a flat tire.
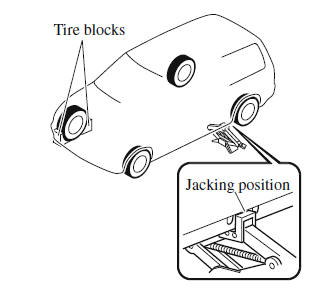
If you have a flat tire, drive slowly to a level spot that is well off the road and out of the way of traffic to change the tire. Stopping in traffic or on the shoulder of a busy road is dangerous. WARNING Be sure to follow the directions for changing a tire: Changing a tire is dangerous if not done properly. The vehicle can slip off the jack and seriously injure someone. No person should place any portion of their body under a vehicle that is supported by a jack. Never allow anyone inside a vehicle supported by a jack: Allowing someone to remain in a vehicle supported by a jack is dangerous. The occupant could cause the vehicle to fall resulting in serious injury. NOTE Make sure the jack is well lubricated before using it. 1. Park on a hard, level surface off the right-of-way and firmly set the parking brake. 2. Shift into Park (P) and turn off the engine. 3. Turn on the hazard warning flasher. 4. Have everyone get out of the vehicle and away from the vehicle and traffic. 5. Remove the jack, tool, and spare tire. 6. Block the wheel diagonally opposite the flat tire. When blocking a wheel, place a tire block both in front and behind the tire.
NOTE When blocking a tire, use rocks or wood blocks of sufficient size if possible to hold the tire in place. Removing a Flat Tire WARNING When jacking-up a vehicle, always shift the selector lever to P, apply the parking brake, and place wheel blocks in the position diagonally opposed to the jack: Changing a flat tire without using wheel blocks is dangerous because the vehicle may move and fall off the jack even with the select lever is in P, which could result in an accident. 1. Loosen the lug nuts by turning them counterclockwise one turn each, but do not remove any lug nuts until the tire has been raised off the ground.
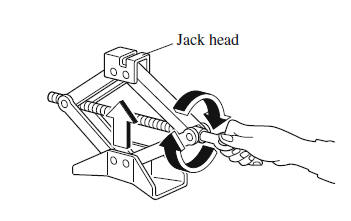
2. Place the jack on the ground. 3. Turn the jack screw in the direction shown in the figure and adjust the jack head so that it is close to the jack-up position.
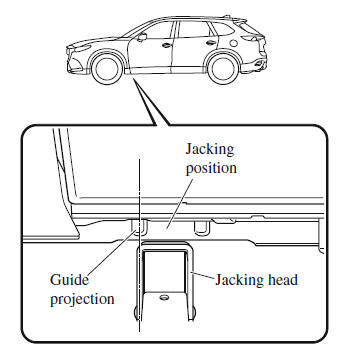
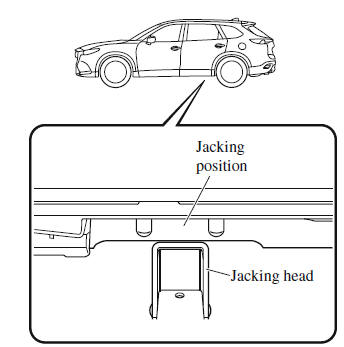
4. Set the jack to the designated jack-up position closest to the tire being removed. (Jacking-up the vehicle front) Set the groove on the top of the jack head at a right angle into the center of the designated jack-up position guide projection closest to the vehicle front.
NOTE Always set the jack into the designated jack-up position shown in the figure correctly. (Jacking-up the vehicle rear) Set the groove on the top of the jack head at a right angle between the designated jack-up position guide projections.
5. Continue raising the jack head gradually by rotating the screw with your hand until the jack head is inserted into the jack-up position.
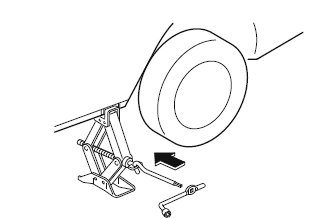
WARNING Use only the front and rear jacking positions recommended in this manual: Attempting to jack the vehicle in positions other than those recommended in this manual is dangerous. The vehicle could slip off the jack and seriously injure or even kill someone. Use only the front and rear jacking positions recommended in this manual. Do not jack up the vehicle in a position other than the designated jack-up position or place any objects on or under the jack: Jacking up the vehicle in a position other than the designated jack-up position or placing objects on or under the jack is dangerous as it could deform the vehicle body or the vehicle could fall off the jack resulting in an accident. Use only the jack provided with your Mazda: Using a jack that is not designed for your Mazda is dangerous. The vehicle could slip off the jack and seriously injure someone. Never place objects under the jack: Jacking the vehicle with an object under the jack is dangerous. The jack could slip and someone could be seriously injured by the jack or the falling vehicle. NOTE When raising the jack head into the jacking position and aligning the groove in the jack head with the rail under the vehicle body, the top of the jack head contacts the vehicle's underbody without the rail contacting the bottom of the groove. 6. Insert the jack lever and attach the lug wrench to tire jack.
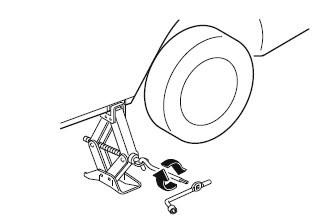
7. Turn the jack handle clockwise and raise the vehicle high enough so that the spare tire can be installed. Before removing the lug nuts, make sure your Mazda is firmly in position and that it cannot slip or move.
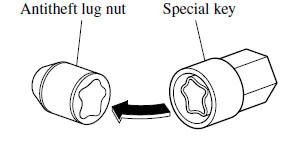
WARNING Do not jack up the vehicle higher than is necessary: Jacking up the vehicle higher than is necessary is dangerous as it could destabilize the vehicle resulting in an accident. Do not start the engine or shake the vehicle while it is jacked up: Starting the engine or shaking the vehicle while it is jacked up is dangerous as it could cause the vehicle to fall off the jack resulting in an accident. Never go under the vehicle while it is jacked up: Going under the vehicle while it is jacked up is dangerous as it could result in death or serious injury if the vehicle were to fall off the jack. 8. Remove the lug nuts by turning them counterclockwise; then remove the wheel and center cap. Locking Lug Nuts If your vehicle has Mazda optional antitheft wheel lug nuts, each wheel will have one locking lug nut that locks the wheel and tire, and you must use a special key to unlock the locking lug nut. This key is stored in the glove compartment. Register the key and lug nuts with the lock manufacturer by filling out the card provided in the glove compartment and mailing it in the accompanying envelope. If you lose this key, consult an Authorized Mazda Dealer or use the lock manufacturer's order form, which is with the registration card. Accessory wheel locks cannot be used on steel wheels. This includes situations when the spare tire is installed. If the spare tire is installed, one of the original lug nuts (which should still be in the vehicle) must be installed in place of the wheel lock.
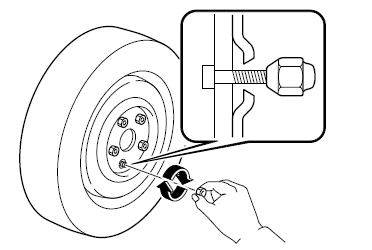
To remove an antitheft lug nut 1. Obtain the special key for the antitheft lug nut. 2. Place the special key on top of the antitheft lug nut, and be sure to hold the key square to it. If you hold the key at an angle, you may damage both key and nut. Do not use a power impact wrench. 3. Place the lug wrench on top of the key and apply pressure. Turn the wrench counterclockwise. To install the antitheft lug nut 1. Place the special key on top of the nut, and be sure to hold the key square to it. If you hold the key at an angle, you may damage both key and nut. Do not use a power impact wrench. 2. Place the lug wrench on top of the special key, apply pressure, and turn it clockwise.
Mounting the Spare Tire NOTE The number and shape of the flat tire belt differ depending on the vehicle specification.
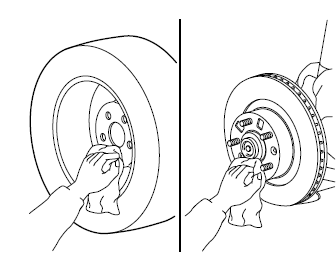
1. Remove dirt and grime from the mounting surfaces of the wheel and hub, including the hub bolts, with a cloth.
WARNING Make sure the mounting surfaces of the wheel, hub and lug nuts are clean before changing or replacing tires: When changing or replacing a tire, not removing dirt and grime from the mounting surfaces of the wheel, hub and hub bolts is dangerous. The lug nuts could loosen while driving and cause the tire to come off, resulting in an accident. 2. Mount the spare tire. 3. Install the lug nuts with the beveled edge inward; tighten them by hand.
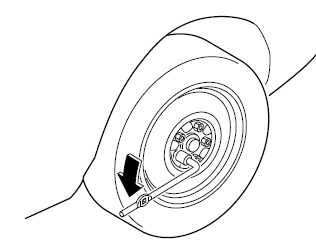
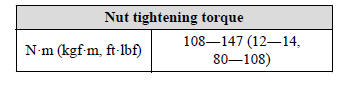
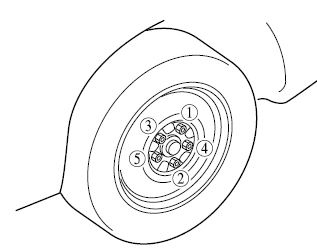
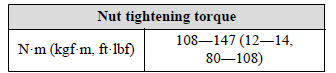
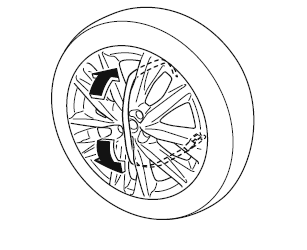
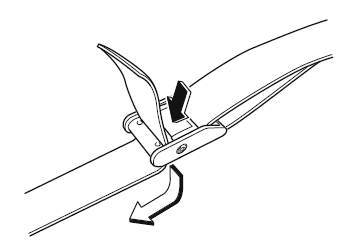
WARNING Do not apply oil or grease to lug nuts and bolts and do not tighten the lug nuts beyond the recommended tightening torque: Applying oil or grease to lug nuts and bolts is dangerous. The lug nuts could loosen while driving and cause the tire to come off, resulting in an accident. In addition, lug nuts and bolts could be damaged if tightened more than necessary. 4. Turn the lug wrench counterclockwise and lower the vehicle. 5. Use the lug wrench to tighten the nuts in the order shown.
If you are unsure of how tight the nuts should be, have them inspected at an Authorized Mazda Dealer.
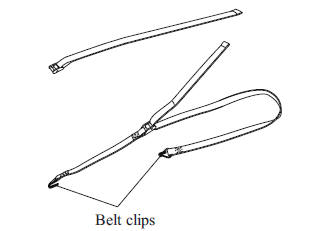
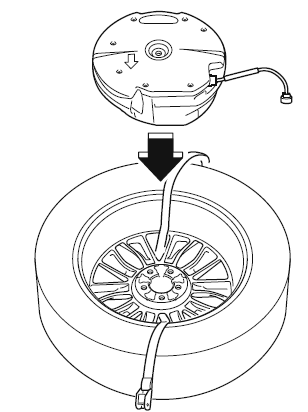
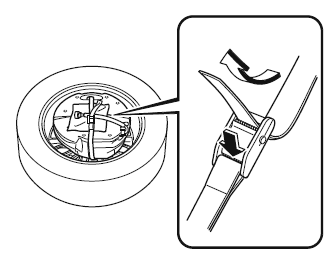
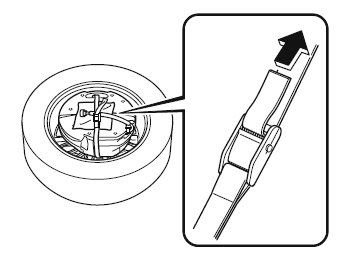
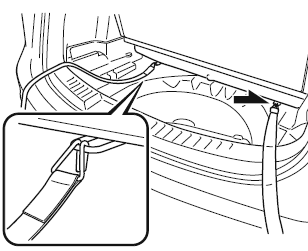
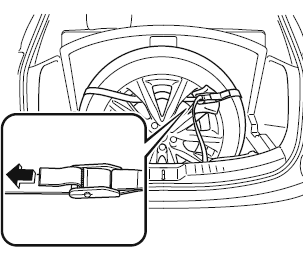
WARNING Always securely and correctly tighten the lug nuts: Improperly or loosely tightened lug nuts are dangerous. The wheel could wobble or come off. This could result in loss of vehicle control and cause a serious accident. Be sure to reinstall the same nuts you removed or replace them with metric nuts of the same configuration: Because the wheel studs and lug nuts on your Mazda have metric threads, using a non-metric nut is dangerous. On a metric stud, it would not secure the wheel and would damage the stud, which could cause the wheel to slip off and cause an accident. 6. (Vehicles with sub-woofer) Secure the sub-woofer to the flat tire using the flat tire belt.
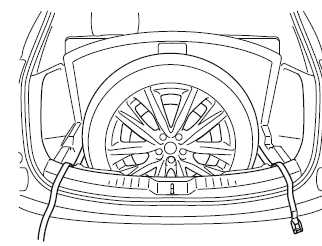
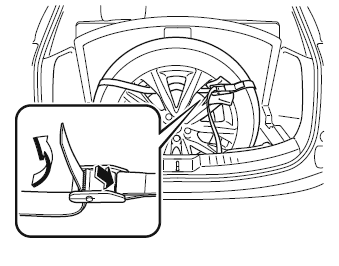
CAUTION When pulling the flat tire belt, wrap the buckle with a cloth. If the buckle directly contacts the sub-woofer, the sub-woofer may be damaged. 7. (Vehicles except for Mexico) Secure the flat tire in the luggage compartment using the flat tire belt.
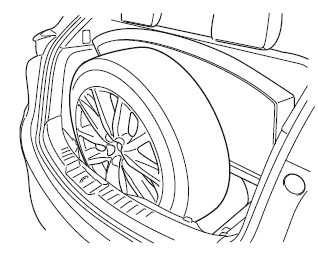
CAUTION When pulling the flat tire belts, wrap the buckle with a cloth. If the buckle directly contacts the aluminum wheel, the wheel may be damaged. 8. (Vehicles for Mexico) Place the flat tire in the luggage compartment so that it leans against the luggage board.
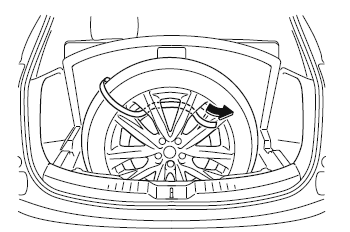
CAUTION Tuck a cloth between the flat tire and the vehicle trim. If the flat tire directly contacts the vehicle trim, the trim may be damaged. 9. Slowly close the liftgate while making sure that the liftgate trim does not contact the flat tire. NOTE If the liftgate trim contacts the flat tire, adjust the position of the flat tire. 10. Make sure that the liftgate closes securely. 11. Check the tire inflation pressure. 12. Have the flat tire repaired or replaced as soon as possible. WARNING Do not drive with any tires that have incorrect air pressure: Driving on tires with incorrect air pressure is dangerous. Tires with incorrect pressure could affect handling and result in an accident. When you check the regular tires' air pressure, check the spare tire, too. NOTE To prevent the jack and tool from rattling, store them properly. |


See More:
Mazda CX-9 Owners Manual > Switches and Controls: Turn and Lane-Change
Signals
The ignition must be switched ON to use the turn and lane-change signals. Turn Signals Move the signal lever down (for a left turn) or up (for a right turn) to the stop position. The signal will self-cancel after the turn is completed. If the indicator light continues to flash after a turn, manually ...
Mazda CX-9 Owners Manual
