Mazda CX-9 Owners Manual: Front Seat
Adjusting the Driver's Seat Using the driving position set up procedure recommended by Mazda allows you to maintain a relaxed posture, drive the vehicle for longer periods without feeling tired, and make quick operations naturally. Also, you can be assured of a clear view in the forward direction to help you drive more safely and comfortably. The adjustments for the driving position recommended by Mazda are done using the following procedures.
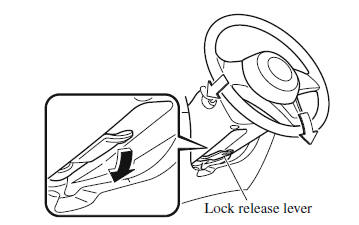
Before making adjustments to the driving position recommended by Mazda Before making adjustments, move the steering wheel and seat to their default positions. How to move the steering wheel to its default position WARNING Never adjust the steering wheel while the vehicle is moving: Adjusting the steering wheel while the vehicle is moving is dangerous. Moving it can very easily cause the driver to abruptly turn to the left or right. This can lead to loss of control or an accident. After adjusting the steering wheel position, make sure it is securely locked by trying to move it up and down: Driving with the steering wheel not securely locked in position is dangerous. If the steering wheel moves unexpectedly while driving, you could lose control of the steering resulting in an accident. Lower the lever, move the steering wheel to the lowest position, and then push it down and all the way back.
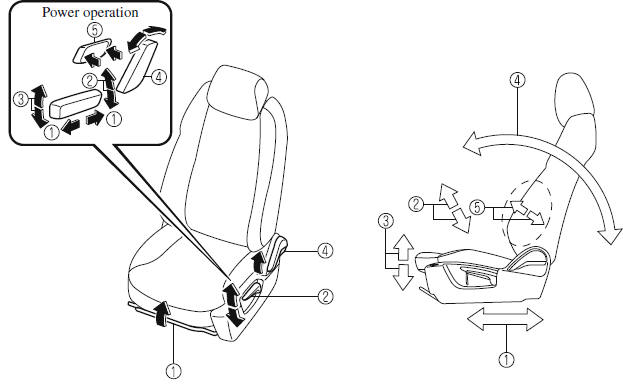
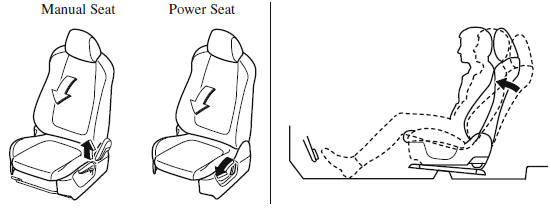
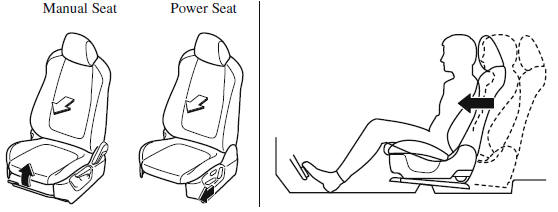
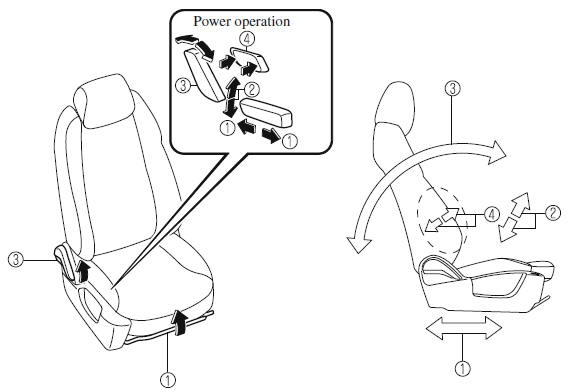
How to move a driver's seat to its default position 1. Slide the seat all the way back. 2. Lower the seat to its lowest height. 3. Sit squarely in the seat and rest your back against the seatback. Seat adjustment procedure for the driving position recommended by Mazda Adjusting the seatback angle (reclining) Adjust the seatback to the angle providing a comfortable seated posture. 1. With your posture slightly slouched, move the seatback forward to the angle where your waist feels slightly cramped.
2. Move the seatback backward to a comfortable seated posture without any feeling of cramping in your waist.
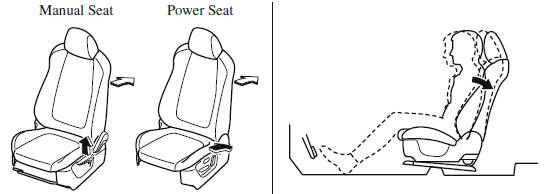
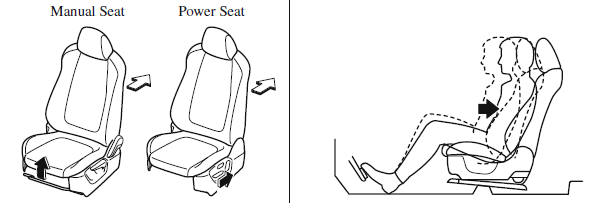
Adjusting the seat position forward and back (sliding) Adjust the seat to the position best for operating the accelerator and brake pedals. 1. Place your left foot on the footrest, your right foot between the accelerator and brake pedals, and position your heel to the position allowing easy switching between the pedals. 2. With your heel set on the floor, set your right foot on the brake pedal and move the seat forward as far as possible until you feel a slight cramping in your ankle.
3. With your right foot set on the brake pedal, move the seat back until you no longer feel cramping in your ankle. 4. With your heel set on the floor, make sure you can move your foot between the brake pedal and accelerator pedal smoothly. 5. Depress the accelerator pedal completely with your heel set on the floor and make sure that your ankle does not feel over-stretched.
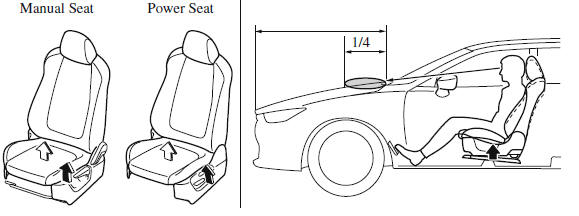
Adjusting the seat height Adjust the seat height to a position where you have a clear forward view and you can drive the vehicle easily. 1. With your back resting against the seatback, adjust the seat to the height where you can see the first quarter part of the hood from the windshield. With the manual seat, if you raise the seat height, the seat moves forward. Adjust the seat forward or back again.
Adjusting the steering wheel position Adjust the steering wheel to the position where it can be operated easily and the gauges can be viewed easily. 1. With your back resting against the seatback, extend both arms, place them on the top of the steering wheel, and pull the steering wheel towards you to the position of your wrists.
2. Adjust the steering wheel height so that the gauges can be viewed easily. 3. Raise the lever to securely lock the steering wheel.
Adjusting the head restraint position To prevent shock to the head and neck, adjust the head restraints to their correct positions. Driving Position Memory The desired driving position can be called up after programming the position. The following driving positions can be programmed.
CAUTION Do not place fingers or hands around the bottom of the seat while the seat memory function is operating. The seat moves automatically while the seat memory function is operating and fingers or hands could get pinched and injured.
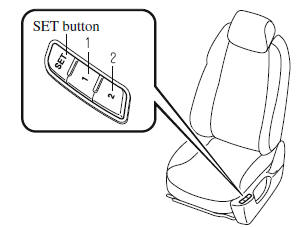
A driving position can be programmed or operated using the buttons on the side of the seat or the key. NOTE
Programming 1. Make sure the parking brake is on. 2. Make sure the selector lever is in the P position. 3. Start the engine. 4. Adjust the seat and the active driving display to the desired driving position. 5. Press the SET button on the seat until a beep sound is heard 1 time. 6. Perform one of the following settings within 5 seconds of completing step 5 above:
NOTE If a beep sound is heard 3 times, the operation is canceled. To move the driving position to a programmed position (Using a button on the side of the seat) 1. Make sure the parking brake is on. 2. Make sure the selector lever is in the P position. 3. Start the engine. 4. Press the programming button for the driving position you want to call up (button 1 or 2). 5. A beep sound is heard when the driving position adjustment is completed. NOTE
(Using a programmed key) 1. Unlock the doors by pressing a request
switch or the key 2. After unlocking the doors, the seat position adjustment begins within 40 seconds of opening the driver's door, and a beep sounds when the operation is finished. 3. Make sure the parking brake is on. 4. Make sure the selector lever is in the P position. 5. Start the engine. 6. The active driving display adjustment begins. NOTE
Erasing programmed driving positions (Erasing the driving positions programmed to the key) 1. Switch the ignition OFF. 2. Press the SET button on the side of the seat until a beep sound is heard 1 time.
3. After the beep sounds, press the key
NOTE If a beep sound is heard 3 times, the operation is canceled. Adjusting the Front Passenger's Seat
|
 button until a beep
sound is heard 1 time.
button until a beep
sound is heard 1 time. button or


See More:
Mazda CX-9 Owners Manual > i-ACTIVSENSE: Radar Sensor (Front)
Your vehicle is equipped with a radar sensor (front). The following systems also use the radar sensor (front). Distance Recognition Support System (DRSS) Mazda Radar Cruise Control with Stop & Go function (MRCC with Stop & Go function) Smart Brake Support (SBS) The radar sensor (front) funct ...
Mazda CX-9 Owners Manual
