Mazda CX-9 Owners Manual: Rear View Monitor
Rear View Monitor The rear view monitor provides visual images of the rear of the vehicle when reversing. WARNING Always drive carefully confirming the safety of the rear and the surrounding conditions by looking directly with your eyes: Reversing the vehicle by only looking at the screen is dangerous as it may cause an accident or a collision with an object. The rear view monitor is only a visual assist device when reversing the vehicle. The images on the screen may be different from the actual conditions. CAUTION
NOTE
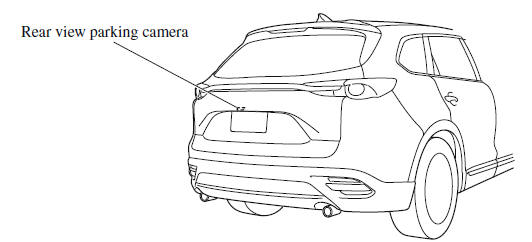
Rear View Parking Camera Location
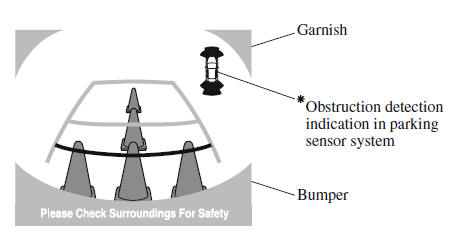
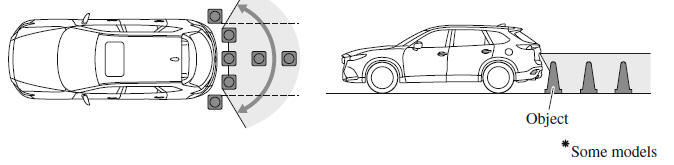
Switching to the Rear View Monitor Display Shift the selector lever to reverse (R) position with the ignition switched ON to switch the display to the rear view monitor display. NOTE When the selector lever is shifted from reverse (R) position to another selector lever position, the screen returns to the previous display. Displayable Range on the Screen The images on the screen may be different from the actual conditions. (Screen display)
(Actual view)
NOTE
Viewing the Display Guide lines which indicate the width of the vehicle (yellow) are displayed on the screen as a reference to the approximate width of the vehicle in comparison to the width of the parking space you are about to back into. Use this display view for parking your vehicle in a parking space or garage.
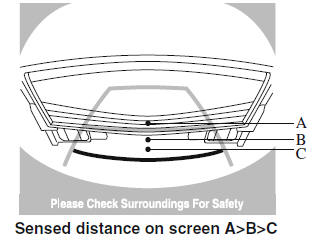
a) Vehicle width guide lines (yellow). These guide lines serve as a reference to the approximate width of the vehicle. b) Distance guide lines. These guide lines indicate the approximate distance to a point measured from the vehicle's rear (from the end of the bumper).
CAUTION The guide lines on the screen are fixed lines. They are not synced to the driver's turning of the steering wheel. Always be careful and check the area to the vehicle's rear and the surrounding area directly with your eyes while backing up. Rear View Monitor Operation The operation of the rear view monitor when reversing the vehicle varies depending on the traffic, road, and vehicle conditions. The amount of steering and the timing also varies depending on conditions, so confirm the surrounding conditions directly with your eyes and steer the vehicle in accordance with the conditions. Be well aware of the above cautions prior to using the rear view monitor. NOTE Images displayed on the monitor from the rear view parking camera are reversed images (mirror images). 1. Shift the selector lever to reverse (R) position to switch the display to the rear view monitor display. 2. Confirming the surrounding conditions, reverse the vehicle. (Display condition)
(Vehicle condition)
3. After your vehicle begins entering the parking space, continue backing up slowly so that the distance between the vehicle width lines and the sides of the parking space on the left and right are roughly equal. 4. Continue to adjust the steering wheel until the vehicle width guide lines are parallel to the left and right sides of the parking space. 5. Once they are parallel, straighten the wheels and back your vehicle slowly into the parking space. Continue checking the vehicle's surroundings and then stop the vehicle in the best possible position. (Display condition)
(Vehicle condition)
6. When the selector lever is shifted from reverse (R) to another selector lever position, the screen returns to the previous display. NOTE
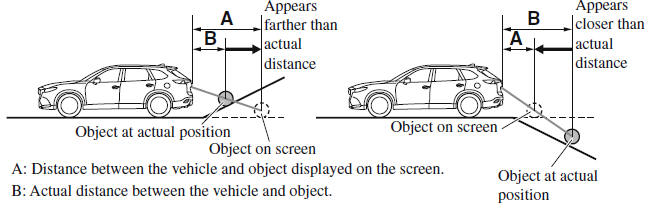
Variance Between Actual Road Conditions and Displayed Image Some variance occurs between the actual road and the displayed road. Such variance in distance perspective could lead to an accident. Note the following conditions that may cause a variance in distance perspective. When the vehicle is tilted due to the weight of passengers and load When the vehicle rear is lowered, the object displayed on the screen appears farther than the actual distance.
When there is a steep grade behind the vehicle When there is a steep upgrade (downgrade) behind the vehicle, the object displayed on the screen appears farther (downgrade: closer) than the actual distance.
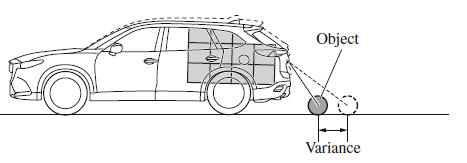
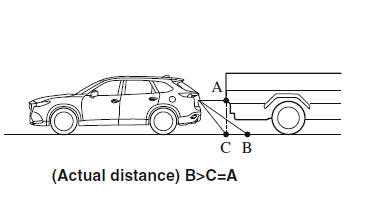
Three-dimensional object on vehicle rear Because the distance guide lines are displayed based on a flat surface, the distance to the three-dimensional object displayed on the screen is different from the actual distance. (Screen display)
(Actual condition)
Picture Quality Adjustment WARNING Always adjust the picture quality of the rear view monitor while the vehicle is stopped: Do not adjust the picture quality of the rear view monitor while driving the vehicle. Adjusting the picture quality of the rear view monitor such as brightness, contrast, color, and tint while driving the vehicle is dangerous as it could distract your attention from the vehicle operation which could lead to an accident. Picture quality adjustment can be done while the selector lever is in reverse (R) There are 4 settings which can be adjusted including, brightness, contrast, tint, and color. When adjusting, pay sufficient attention to the vehicle surroundings.
1. Select the 2. Select the desired tab item. 3. Adjust the brightness, contrast, tint, and color using the slider. If you need to reset, press the reset button.
4. Select the |
 icon on the screen to
display the tabs.
icon on the screen to
display the tabs.

See More:
Mazda CX-9 Owners Manual > Fuel and Emission: Fuel and Engine Exhaust
Precautions
Fuel Requirements Vehicles with catalytic converters or oxygen sensors must use ONLY UNLEADED FUEL, which will reduce exhaust emissions and keep spark plug fouling to a minimum. This vehicle will perform best with fuel listed in the table. Fuel Octane Rating* (Anti-knock index) Regular unleaded fue ...
Mazda CX-9 Owners Manual
